cute and quick…

need a quick and easy little gift…oh and did i mention cute!  i made a bunch of these for my son’s valentines for school.  oh and don’t forget sale-a-bration started, FREE items for every $50 you spend.  go to my stampin’ up! site for details!

supplies: (all stampin’ up! unless noted)

  • owl punch
  • large scallop punch
  • misc cardstock colors
  • red dazzling details
  • cellophane bags (these were in the holiday mini, but are still available)

punch out all the owl parts and assemble.  Punch out 2 scallops.  attach owl to one scallop.  put goodies into the cellophane bag.  i put adhesive all over the plain scallop, and mashed the bag and other scallop together.  had my peanut sign his name, and added red dazzling details to the heart on the owl…and voila, you are done!!!

dont have all the supplies?  click here and jump on over to my site to buy all the supplies!

hope you enjoyed and keep on stampin!

nicole

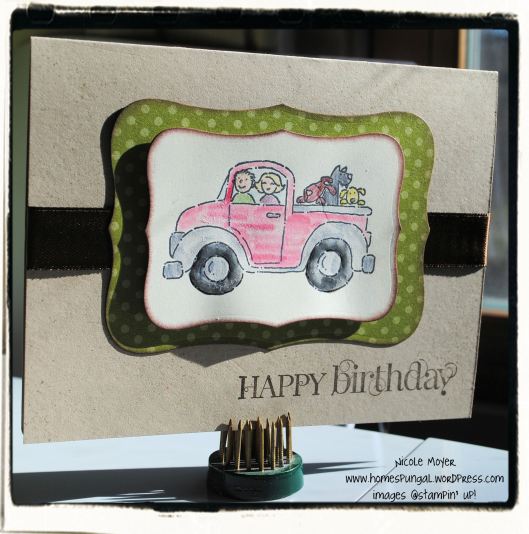
driving by…


my valentine’s version…
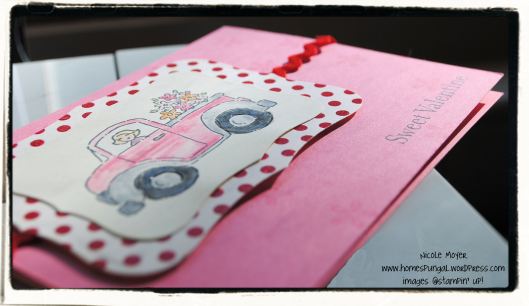
i was making this card originally as a valentine’s card, and then realized i needed to make birthday cards for a set of twins i know, one being my hubby!  the best part is we have a yellow lab mix and the twin has a chocolate and black lab, so i colored all the dogs accordingly…tricky huh!!  wonder if they noticed, though:)  now on to the card(s)…oh and don’t forget sale-a-bration started, FREE items for every $50 you spend.  go to my stampin’ up! site for details!

supplies: (all stampin’ up! unless noted)

  • labels collection framelits die (new in occasions mini)
  • big shot
  • loads of love stamp set
  • loads of love accessories stamp set
  • curly cute stamp set
  • crumb cake cardstock
  • whisper white cardstock
  • pattern paper dsp – regals collection (i used old olive)
  • chocolate chip satin ribbon
  • early espresso ink
  • sponge daubers
  • blender pens
  • crystal effects
  • stampin dimensionals
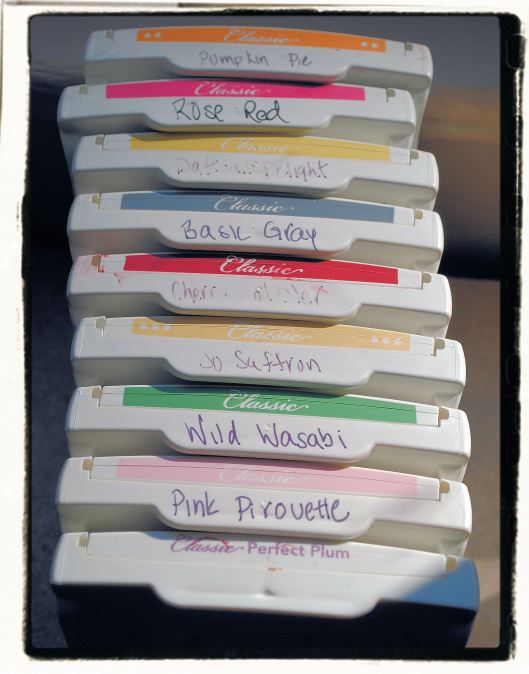
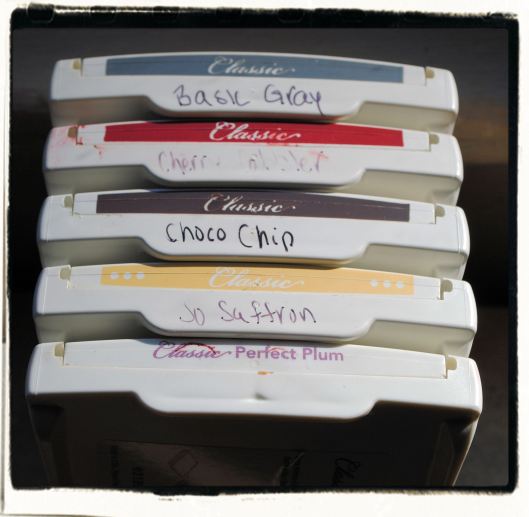
  • various ink pads (see colors below)


stamp sentiment on bottom right corner of card in early espresso ink.  stamp truck, dogs, and people with early espresso ink onto whisper white cs (i used the stamp-a-ma-jig, to line everything up).  color in with various color inks using blender pens.  cut out along with piece of patterned dsp using the labels framelets in the big shot.  ink edges of both using a sponge dauber and early espresso ink.  wrap ribbon around card.  attach pattern dsp to card, and use dimensionals to attach truck.  use crystal effects on the tires and let dry (this step takes a couple of hours to dry, so grab a drink and a snack, then check on it, do a load of laundry, then check on it, take a nap,then check on it…yep, should be nice and dry now:)…and voila, you are done!!!

for the valentine’s card, i used pretty in pink cardstock, leftover christmas dsp, and some random rick rack from my stash.  I also offset the truck in the upper left corner, versus the center, and stamped a random flower on the background in versa mark.  these are the inks i used to color everything in with my blender pens.
dont have all the supplies?  click here and jump on over to my site to buy all the supplies!

hope you enjoyed and keep on stampin!

nicole

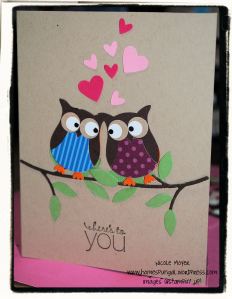
love is in the air…


well now that the holidays are over, time to get back to card making!  valentine’s day is right around the corner so i have a couple of cute cards to share over the next couple of weeks…

supplies: (all stampin’ up! unless noted)

  • owl punch
  • small heart punch
  • little leaves sizzlit
  • big shot
  • wild wasabi cardstock
  • chocolate chip cardstock
  • whisper white cardstock
  • basic black cardstock
  • crumb cake cardstock
  • melon mambo cardstock
  • pretty in pink cardstock
  • pumpkin pie cardstock
  • scraps of designer series paper
  • early espresso ink
  • friendly phrases stamp set
  • 2 way glue pen

punch out owl parts and assemble from whisper white , black, pumpkin pie, choco chip and crumb cake cs, and dsp.  cut out 2 branches in wild wasabi cs and choco chip cs.  cut off the leaves on the choco chip branches and glue the “stick” onto the green branch.  punch out hearts from melon mambo cs and pretty in pink cs.  assemble all the cut-outs on your crumb cake card.  stamp greeting in early espresso ink…and voila, you are done!!!

dont have all the supplies?  click here and jump on over to my site to buy all the supplies!

hope you enjoyed and keep on stampin!

nicole

peace and joy

so i thought i was done making christmas cards and then i remembered i had to make cards for my work!  so to do something different this year (and new for my blog), i decided to use My Digital Studio from stampin’up!.  i have been working on a scrapbook for my dad in this program (and when i say working on it, it has been since july!!) , so i thought why not try a card.  then that lead me to photographing my son, niece and nephew for the annual picture that my mom adds to her cards and i had to My Digital Studio it up!  i will share that in the upcoming weeks (dont want to spoil to surprise to anyone who may be receiving it!!).

The cool thing about My Digital Studio is you can replicate a paper version of a card (click here to see the paper card version i found on another site), and you only have to make one and have them printed… no more hours of cutting when you need to make a large quantity of cards.  of course, my first love will always be paper cards, but this program is alot of fun to use!!

want to check out more about My Digital Studio and see more samples…click here

supplies: (all stampin’ up! unless noted)

  • My Digital Studio
  • medallion stamp brush set – digital download
  • wordplay stamp brush set – digital download
  • basic pearls and rhinestones – digital download
  • seam binding ribbon – digital download
  • brad add-on pack – digital download

 dont have all the supplies?  click here and jump on over to my site to buy all the supplies!

hope you enjoyed and keep on stampin!

nicole

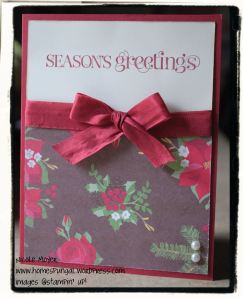
season greetings…


this is my third and final christmas card!  so get to making your cards, it will be christmas in 27 days!!  and to all the great white hunters out, good luck packing the freezer and be safe!

supplies: (all stampin’ up! unless noted)

  • curly cute stamp set
  • cherry cobbler ink pad and cardstock
  • very vanilla cardstock
  • holly jolly dsp
  • cherry cobbler seam binding ribbon
  • pearls

 cut out piece of very vanilla cs and stamp greeting in cherry cobbler ink.  attach piece of dsp to very vanilla cs and tie ribbon in a bow.  attach that to cherry cobbler cs.  add 2 pearls and yep…that easy and cute!

dont have all the supplies?  click here and jump on over to my site to buy all the supplies!

hope you enjoyed and keep on stampin!

nicole

looks like snow…


…on my card, that is:)  christmas music started playing at work and i am sooo excited!  i love christmas music!  so keeping with the christmas theme, on to the card…oh and happy turkey day!!

supplies: (all stampin’ up! unless noted)

  • season of friendship stamp set
  • teeny tiny wishes stamp set
  • whisper white cardstock
  • pool party cardstock and ink pad
  • chocolate chip cardstock and ink
  • cherry cobbler ink pad
  • dazzling details
  • snow burst embossing folder
  • stampin dimensionals
  • big shot

 run pool party cs thru the big shot in the embossing folder.  stamp tree in choco chip ink on whisper white cs.  stamp snowflakes in pool party ink as the “leaves”.  stamp greeting in cherry cobbler next to tree.  stamp bird in cherry cobbler ink on scrap of whisper white cs and cut out.  attach to tree with stampin dimensional.  then attach layers: white, choco chip, embossed pool party, white.  add dazzling details to snowflakes and yep..that cute and easy!

dont have all the supplies?  click here and jump on over to my site to buy all the supplies!

hope you enjoyed and keep on stampin!

nicole

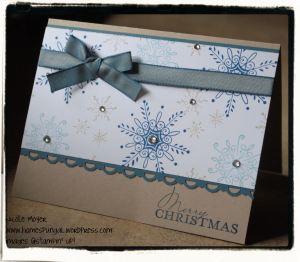
it’s beginning to look alot like…


hello!  so if you were at my stack-a-stamp class this weekend, this card is not new to you.  also, if you visit Andrea Walford’s website, this card might seem familiar!  this card was waaaayyyy to awesome to not copy!  so Andrea, thank-you!  so on with the card…

supplies: (all stampin’ up! unless noted)

  • serene snowflake stamp set
  • contempo christmas stamp set
  • crumb cake cardstock and ink pad
  • not quite navy cardstock and ink pad
  • whisper white cardstock
  • baja breeze ink pad
  • rhinestones
  • scallop edge punch
  • not quite navy taffeta ribbon

 stamp the snowflakes with baja breeze, not quite navy and crumb cake ink onto whisper white cs.  cut a small strip of not quite navy cs and attach to the top of the whisper white cs.  punch a piece of not quite navy cs and attach to the bottom of the whisper white cs.  attach to crumb cake card.  stamp “merry christmas” in not quite navy ink.  tie ribbon in a bow around the card.  add rhinstones and yep..that cute and easy!

dont have all the supplies?  click here and jump on over to my site to buy all the supplies!

hope you enjoyed and keep on stampin!

nicole

Image

yet another thanks!


well…what a couple of crazy days!  we had 6″ of snow on saturday and lost power till today (tuesday)!  i will never take running water for granted again!  we did have fun, though…played board games, made smores on the wood stove and just sat around and laughed!  so there was some good that came out of the bad and we found out how wonderful our friends are!  i have to give the hensel’s a HUGE thanks for inviting us on sunday for the steelers game (they won of course!), pizza and showers!  and thanks to ellen for letting me use her shower this morning before work!  so i thought it would be appropriate to post a thank-you card…

supplies: (all stampin’ up! unless noted)

  • curly cute stamp set
  • spice cake dsp
  • early espresso ink
  • sahara sand cardstock
  • more mustard cardstock
  • crumb cake ink pad
  • linen thread
  • very vanilla button
  • ribbon edge punch
  • corner rounder punch
  • mini glue dot
  • sponge

first round the bottom corners of the card with the corner rounder punch.  then i sponged the edges of the sahara sand cs with a sponge wedge and crumb cake ink.  then i stamped my sentiment in early espresso ink.  punch out 2 strips of more mustard cs with the ribbon punch.  cut a piece of spice cake dsp and attach more mustard strip to top and bottom.  attach to card.  wrap linen thread around card and tie a button on (i put a mini glue dot on the back of the button to secure to card) and yep..that cute and easy!

dont have all the supplies?  click here and jump on over to my site to buy all the supplies!


hope you enjoyed and keep on stampin!

nicole

always gives thanks… a thank-you card that is!


busy, busy, busy…seems to be the theme around here these days!  since i had this crazy thought that i have all the time in the world, i decided to sign up to sell Tastefully Simple in addition to Stampin’ Up!, plus i started making flower hair clips and pins, along with my cards and have started doing the craft fair/vendor fairs circuit.  i hope in the next couple of days to update my blog and “spruce” it up a little, ready for a change!  after that, on to posting my “stuff” on etsy!  so stay tuned!!  well onto my card…

supplies: (all stampin’ up! unless noted)

  • day of gratitude stamp set
  • spice cake dsp
  • soft suede ink pad and cardstock
  • pool party cardstock
  • very vanilla cardstock
  • crumb cake ink pad
  • certainly celery ink pad
  • more mustard ink pad
  • cajun crazy ink pad
  • sponge
  • decorative label punch
  • ribbon punch
  • stampin dimensionals

first i sponged the edges of the soft suede cs with a sponge wedge and soft suede ink.  cut and attach a piece of spice cake dsp to the soft suede cs.  punch pool party cs with ribbon punch and attach.  stamp sentiment in soft suede ink onto very vanilla cs and ink edges using sponge wedge and crumb cake ink.  attach with dimensionals.  next stamp and cut out 3 leaves…one certainly celery, one soft suede and one with more mustard and cajun craze using the rock and roll technique (click here for directions on how to rock and roll).  attach to card and yep..that cute and easy!

dont have all the supplies?  click here and jump on over to my site to buy all the supplies!

and dont forget to get out there and enjoy all the splendors fall has to offer!  the pumpkin patch is a favorite spot for my family!  we always have to take our annual family pumpkin patch picture!

hope you enjoyed and keep on stampin!

nicole
take note…


alittle something i was working on…


so i have not posted in awhile..alot going on, but i am hoping to get back on schedule…HOPING!!  one of my co-workers asked me to make a notebook for her daughter.  she recently got engaged, so she wanted the guests at the engagement party to leave the happy couple with any wedding or marital advise they were willing to share.  the happy couple loves the fall, so why not use some new stampin’ up! product!!

supplies: (all stampin’ up! unless noted)

  • sticky tape
  • spice cake dsp
  • pool party cs
  • chocolate chip cs
  • chocolate chip satin ribbon
  • crumb cake ink pad
  • chocolate chip ink pad
  • marina mist ink pad
  • sponge dauber
  • 1 3/4″ scallop circle punch
  • 1 3/8″ circle punch
  • pearls
  • on board alphabet soup chipboard letters
  • gold glow smooch spritz
  • tombow glue
  • composition book (from staples)

first i covered the inside of the notebook with chocolate chip cs and trimmed.  i used sticky strip to attach.  u want a heavy-duty adhesive for this project.  then i attached the spice cake dsp (the last pic is the back of the notebook), and put choco chip ribbon on the seem.  i used the scallop punch and punched a piece of pool party cs and inked the edges with crumb cake ink and a sponge dauber.  use the circle punch and punch a piece of spice cake dsp and ink the edges with crumb cake and attach to pool party cs.  you will need to make 3 of those.  attach one on the back of notebook where the ribbon ends.  place the other one on the inside of the front cover to cover the end of the ribbon.  the third will get the “&” put on it.  ink the chipboard letters with choco chip ink and a sponge dauber.  ink the “&” with marina mist ink (pool party ink will also work).  spray with gold smooch spritz.  once dry assemble (i used tombow glue to attach the letters), and add pearls!  yep..that cute and easy!

dont have all the supplies?  click here and jump on over to my site to buy all the supplies!

hope you enjoyed and keep on stampin!

nicole